Installing a pickup on an acoustic guitar is the process of adding an electronic device that captures the natural sound of your guitar and converts it into an electrical signal. This signal can then be sent to an amplifier or a sound system, allowing you to play your acoustic guitar at a higher volume and with different sound effects.
Imagine being able to take your beloved acoustic guitar and turn it into a powerful instrument that can be heard by a large audience. Whether you’re a seasoned performer or just want to jam with friends, learning how to install a pickup on your acoustic guitar will unlock a world of musical possibilities.
With a pickup installed, your acoustic guitar’s soft and subtle tones can be transformed into bold and amplified sounds. Whether you want to play in a band, record your music, or simply project your melodies across a room, this simple modification can make a significant difference in how your guitar is heard and enjoyed.
Brief explanation of what a pickup is
A pickup is a tiny device that you put on your acoustic guitar. It acts like a microphone, but for your guitar. It takes the sounds your guitar makes and turns them into electrical signals.
Importance of installing a pickup on an acoustic guitar
Putting a pickup on your acoustic guitar is super important. Why? Because it makes your guitar louder! Without a pickup, your guitar can only be heard by the people close to it. But with a pickup, you can connect your guitar to an amplifier and mix acoustic guitar to be heard by a big crowd or when recording your music.
Why Install a Pickup?
Before we dive into the installation process, it’s essential to understand why you might want to install a pickup on your acoustic guitar. Pickups are devices that capture the vibrations of the guitar strings and convert them into electrical signals that can be amplified. Here are some common reasons to install a pickup:
Live Performances
Pickups allow you to connect your acoustic guitar to an amplifier or sound system, making it suitable for live performances in larger venues where the natural sound of the guitar might not project well.
Recording
If you plan to record your acoustic guitar, a pickup can help you capture a clean and consistent sound, making the recording process more manageable.
Versatility
Installing a pickup provides you with the option to switch between acoustic and amplified sounds, giving you more versatility as a musician.
Band Settings
In a band setting, a pickup can help your guitar cut through the mix and maintain its presence alongside other instruments.
Types of Pickups

There are several types of pickups available for acoustic guitars. Each type has its unique characteristics and installation methods. Here are some common types:
Soundhole Pickups
Soundhole pickups are the easiest to install and are suitable for guitars with standard soundholes. They are placed directly inside the soundhole and do not require significant modifications to the guitar.
Under-Saddle Pickups
Under-saddle pickups are installed beneath the guitar’s saddle, making them less visible. They are known for producing a natural and balanced sound.
Contact Microphones
Contact microphones are attached directly to the guitar’s surface, capturing vibrations and delivering a warm, full-bodied sound.
Soundboard Transducers
Soundboard transducers are installed on the guitar’s top, capturing the resonance and vibrations from the soundboard.
Internal Microphones
Internal microphones are mounted inside the guitar body and provide a highly accurate representation of the guitar’s acoustic sound.
The type of pickup you choose depends on your personal preferences, the type of guitar you have, and your playing style. In this guide, we will focus on installing a soundhole pickup, as it is one of the most common choices and relatively easy to install.
Tools and Materials You’ll Need
| Tools | Materials |
| 1. Screwdrivers | 1. Soundhole pickup |
| 2. Wire cutters/strippers | 2. Output jack |
| 3. Soldering iron and solder | 3. Pickup cable |
| 4. Drill and drill bits | 4. Pickup mounting brackets |
| 5. Masking tape | 5. Velcro strips or adhesive putty |
| 6. Pencil | 6. Shielding paint or copper foil (optional) |
Before you begin the installation process, gather the necessary tools and materials. Having everything ready will make the installation smoother and more efficient. Here’s a list of what you’ll need:
Tools:
- Screwdrivers
- Wire cutters/strippers
- Soldering iron and solder
- Drill and drill bits
- Masking tape
- Pencil
Materials:
- Soundhole pickup
- Output jack
- Pickup cable
- Pickup mounting brackets
- Velcro strips or adhesive putty (for securing the output jack)
- Shielding paint or copper foil (optional)
Step-by-Step Guide to Installing a Soundhole Pickup
Now, let’s dive into the step-by-step process of installing a soundhole pickup on your acoustic guitar. This guide assumes that you have some basic knowledge of working with tools and electronics. If you’re uncomfortable with any step, consider seeking the help of a professional luthier or technician.
Step 1: Prepare Your Guitar
Before you begin, it’s essential to prepare your guitar for the installation. Follow these steps:
Loosen the Strings
Use a tuner to loosen the strings on your guitar. You don’t need to remove them completely, but having some slack will make it easier to work on the inside.
Create a Work Area
Lay your guitar on a clean, padded surface to protect the finish. A stable workbench or table covered with a soft cloth or towel works well.
Mark the Pickup Placement
Position the pickup inside the soundhole, so the elements align with your strings. Mark the mounting bracket holes with a pencil to ensure the pickup is centered and properly aligned.
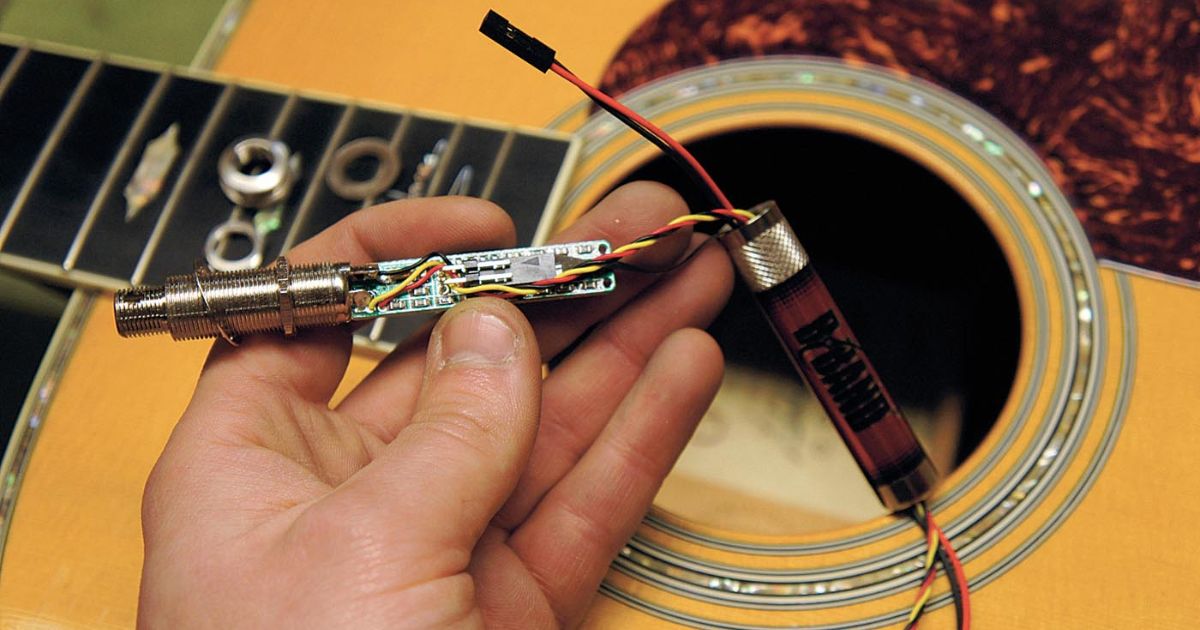
Step 2: Install the Pickup
Now, let’s move on to installing the pickup itself.
Attach the Pickup Mounting Brackets
Most soundhole pickups come with mounting brackets. Use these brackets to secure the pickup inside the soundhole. You may need to use small screws provided with the pickup to attach the brackets securely.
Connect the Pickup
Carefully attach the pickup wires to the output jack. The wires typically have a hot (signal) and a ground (shield) wire. Follow the pickup manufacturer’s instructions for proper wiring. This may involve soldering the connections.
Secure the Pickup
Use the mounting brackets to secure the pickup in place. Ensure it’s snug and won’t move during play.
Step 3: Install the Output Jack
The output jack is where you’ll connect your cable to the amplifier or sound system.
Select a Location
Choose a location on the guitar’s side for the output jack. Common positions include the lower bout or the end block. Ensure it’s accessible and does not interfere with your playing.
Drill the Hole
Use a drill and an appropriate-sized drill bit to create a hole for the output jack. Be careful not to damage the guitar’s finish or interior. If you’re unsure, it’s advisable to consult a professional.
Secure the Output Jack
Attach the output jack to the hole you drilled, following the manufacturer’s instructions. Some jacks come with a nut and washer that you can use to secure them in place. You can also use Velcro strips or adhesive putty to secure the output jack on the guitar’s surface without drilling.
Step 4: Wiring
Wiring is a crucial step in the installation process.
Route the Pickup Cable
Carefully route the pickup cable from the soundhole to the output jack location. Make sure it’s neat and doesn’t obstruct any moving parts or interfere with the guitar’s operation.
Solder the Connections
If your pickup requires soldering, connect the pickup wires to the output jack. Typically, the hot wire is soldered to the center pin, and the ground wire is connected to the outer shell of the jack.
Step 5: Test the Installation
Before restringing your guitar, it’s essential to test the installation to ensure everything is working correctly.
Plug In and Test
Plug your guitar into an amplifier or sound system and strum the strings to check the pickup’s performance. Ensure there are no unwanted noises or buzzing.
Adjust the Pickup
If necessary, adjust the pickup’s height using the mounting brackets to achieve your desired sound. Higher placement may result in a cleaner sound, while lowering it can produce a more resonant tone.
Step 6: Finalize the Installation
With the pickup working correctly, it’s time to finalize the installation.
Reinstall the Strings
Tighten the guitar strings to your preferred tuning. Make sure they are properly seated in the nut and bridge.
Fine-Tuning
Test the guitar’s sound and adjust the pickup’s position and height if needed. Make sure it captures the sound you want.
Optional: Shielding the Electronics
To reduce interference and noise, you can add shielding paint or copper foil to the guitar’s control cavity or pickup cavity. This is particularly useful in electrically noisy environments.
Maintenance and Care
Once you’ve successfully installed your pickup, it’s essential to know how to maintain and care for it.
- Regular Cleaning: Keep the pickup and output jack clean from dust and debris. Use a small brush or compressed air to remove any particles that may accumulate.
- Check the Wiring: Periodically inspect the wiring connections to ensure they are secure. Loose connections can lead to signal interruptions.
- Protect the Output Jack: If you’ve used Velcro strips or adhesive putty to secure the output jack, check and replace them as needed to prevent any accidental detachment.
- Store Your Guitar Properly: When not in use, store your guitar in a safe and dry environment. Extreme temperature and humidity changes can affect the pickup’s performance.
FAQs
What is a pickup for an acoustic guitar?
A pickup is a device that makes your acoustic guitar sound louder by turning its vibrations into an electrical signal.
Is installing a pickup hard to do?
Installing a pickup can be easy if you have basic guitar skills, but it’s best to consult a professional if you’re unsure.
Why should I install a pickup on my acoustic guitar?
Adding a pickup lets you play your guitar in front of a bigger audience and connect it to amplifiers and sound systems, making it versatile and suitable for performances.
Conclusion
Learning how to install a pickup on an acoustic guitar can be a game-changer for musicians seeking to expand their sound and performance capabilities. By adding this simple device, you can take your acoustic guitar from a quiet, intimate instrument to a powerful tool that can be heard by a large audience.
This modification opens up opportunities for live performances, recording, and experimentation with various sound effects. While it may require some basic guitar skills, the process is generally accessible, and there are professionals available to assist if needed. So, whether you’re an aspiring rockstar, a casual jammer, or simply looking to enhance your acoustic guitar’s versatility, Install A Pickup On An Acoustic Guitar can elevate your musical journey, making your melodies resonate and reach new heights. Embrace the world of amplified acoustic music and let your guitar’s voice be heard far and wide.