Playing a C chord on an acoustic guitar, such as when you want to Play C Chord On Acoustic Guitar, involves placing your fingers on specific frets and strings to create a harmonious sound. It’s a fundamental chord for many songs and a key skill for beginners.
Imagine strumming your guitar, creating beautiful melodies, and feeling the joy of music. Learning how to play the C chord on an acoustic guitar is your first step to becoming a guitarist. With a few simple finger placements, you’ll unlock the magic of music.
Mastering the C chord is like opening the door to a world of guitar possibilities. Once you’ve got the hang of it, you’ll be able to play countless songs and progress to more advanced chords and tunes. So, let’s dive in and learn how to play the C chord on your acoustic guitar!
Why the C Chord Matters
The C chord is not just any ordinary chord; it’s a gateway to countless songs in various musical genres. Mastering the C chord will enable you to play songs from folk, rock, pop, and more. Its versatility and ease of transition to other chords make it an essential chord for any guitarist’s repertoire.
Basic Anatomy of the C Chord

Before we dive into the nitty-gritty of playing the C chord, let’s understand the basic anatomy of the chord. The C chord is composed of three notes: C, E, and G. These notes are played together to form a harmonious sound.
Fingering the C Chord
- Use Your Ring Finger: To play the C chord, place your ring finger on the 3rd fret of the 5th (A) string.
- Middle Finger: Position your middle finger on the 2nd fret of the 4th (D) string.
- Index Finger: Place your index finger on the 1st fret of the 2nd (B) string.
Now, let’s break down the process into more detail.
Step-by-Step Guide to Playing the C Chord
Step 1: Proper Guitar Posture
Before we get into fingering the C chord, it’s essential to maintain the correct guitar posture. This ensures comfort and ease while playing.
- Sit or Stand Upright: Maintain good posture while sitting or standing. Ensure your back is straight, and your guitar is positioned comfortably on your lap or strapped across your shoulder.
- Neck and Fretboard Position: Keep the guitar’s neck at a slight upward angle for easy access to the frets. Your left hand should comfortably reach the frets without straining.
Step 2: Tune Your Guitar
Tuning your guitar is crucial before attempting to play any chord. The C chord, like other chords, sounds best when the guitar is in tune.
- Use a Tuner: Invest in a guitar tuner or use a tuning app to ensure your strings are perfectly tuned to the following notes: C (5th string), E (4th string), A (3rd string), D (2nd string), and G (1st string).
- Check String Tension: Ensure that your strings are neither too loose nor too tight. Proper string tension is essential for a clean sound.
Step 3: Finger Placement
Now that your guitar is in tune, let’s move on to the essential part – fingering the C chord.
Use the Pads of Your Fingers: Place your fingers on the fretboard using the pads, not the tips. This will help you avoid accidentally muting adjacent strings.
Fingering the A String: Begin by pressing down the 3rd fret of the 5th (A) string with your ring finger. Make sure your finger is pressing firmly on the string, just behind the fret.
Middle Finger Placement: Place your middle finger on the 2nd fret of the 4th (D) string. Ensure it is positioned close to the fret, and the string rings out clearly.
Index Finger Placement: Finally, use your index finger to press down the 1st fret of the 2nd (B) string. Again, ensure that the finger is close to the fret to prevent buzzing or muting.
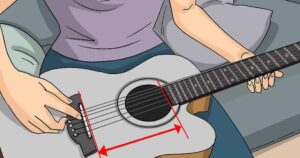
Step 4: Strumming the C Chord
Once your fingers are in the right position, it’s time to strum the chord and hear the beautiful sound of the C chord.
- Position Your Hand: Hold the guitar pick between your thumb and index finger, keeping your wrist straight.
- Strumming Technique: Start your strumming from the 5th (A) string and move downward. Make sure your strumming hand doesn’t touch any other strings but the ones you intend to strum.
- Consistent Strumming: Maintain a steady rhythm while strumming the chord. Experiment with different strumming patterns to see what sounds best to you.
Step 5: Common Mistakes to Avoid
Learning to play the C chord can be challenging for beginners, but knowing common mistakes can help you avoid them.
Muted Strings: Ensure that all the strings you’re not playing are not being accidentally muted by your fingers.
Buzzing Sounds: If you hear buzzing or muted notes, check your finger placement and press down on the strings closer to the frets.
Finger Position: Keep your fingers as close to the frets as possible for clear, clean notes.
Practice Patience: It may take time for your fingers to build the necessary strength and muscle memory. Be patient with yourself.
Step 6: Practice and Progression
As with any skill, practice is the key to mastery. Spend time practicing the C chord daily to build muscle memory and strengthen your fingers.
- Start Slow: Begin with slow and deliberate chord changes. Switch between C and other open chords like G, D, and E to build your chord transition skills.
- Use a Metronome: A metronome can help you maintain a steady rhythm while practicing chord changes.
- Play Along with Songs: To make practice more enjoyable, try playing along with songs that feature the C chord. This will help you apply your new skill in a musical context.
Step 7: Troubleshooting
If you’re still having trouble playing the C chord, don’t get discouraged. Here are some troubleshooting tips:
Check Your Finger Placement: Make sure your fingers are precisely where they need to be. Slight adjustments can make a big difference.
Use Chord Diagrams: Chord diagrams can be a helpful visual guide to ensure your fingers are in the right position.
Chord Progressions Using C Chord
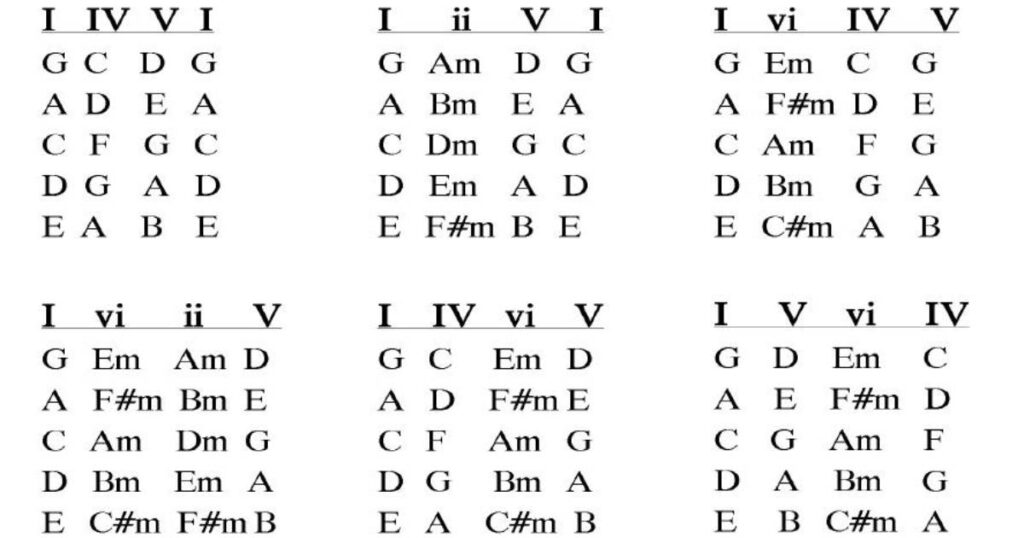
Now that you’ve learned to play the C chord, you can start exploring its potential in various chord progressions. The C chord can be combined with other chords to create beautiful melodies. Here are a few chord progressions to get you started:
C – G – Am – F
This is a classic chord progression used in many popular songs. It includes the C chord, along with G, Am, and F. Practice transitioning between these chords smoothly to play a variety of tunes.
C – F – G
Simplified yet effective, this progression is the basis for countless songs. It involves moving between the C chord, F chord, and G chord. Mastering this sequence will allow you to play a wide range of songs.
C – Dm – Em – Am
For a softer, more mellow sound, try this progression. It incorporates the C chord, Dm, Em, and Am. Practice your finger movements to achieve a seamless flow between these chords.
C – E – A – G – D – F
This progression involves transitioning between six different chords. While it may be more challenging for beginners, mastering it will open up a wealth of musical possibilities.
Additional Tips and Tricks
To enhance your experience and improve your guitar-playing skills, consider these additional tips and tricks:
Use a Capo
A capo can be a helpful accessory that allows you to change the key of a song without changing your finger positions. Experiment with different capo positions to discover new sounds.
Experiment with Strumming Patterns
Don’t limit yourself to one strumming pattern. Try various strumming patterns to add depth and emotion to your playing. You can find strumming patterns online or create your own.
Learn Music Theory
Understanding music theory can greatly improve your guitar skills. Learning about scales, chord progressions, and key signatures will give you a deeper insight into music.
Record Yourself
Recording your practice sessions can be a valuable tool for self-assessment. It allows you to hear your progress and identify areas that need improvement.
Seek Guidance
If you’re serious about mastering the guitar, consider taking lessons from a qualified instructor. They can provide personalized guidance, correct your technique, and accelerate your progress.
FAQ’s
What fingers do I use for the C chord?
Use your ring finger on the 3rd fret of the 5th string, middle finger on the 2nd fret of the 4th string, and index finger on the 1st fret of the 2nd string.
Why does my C chord sound muted or buzzy?
Ensure your fingers are placed close to the frets, press down firmly on the strings, and check your strumming technique for clarity.
Can I play the C chord with a capo?
Yes, you can use a capo by placing it on different frets to change the key while using the C chord shape. Adjust your finger placement accordingly for the desired key.
Conclusion
Learning how to play the C chord on an acoustic guitar is a fundamental skill for aspiring guitarists. It serves as a gateway to the world of music, enabling you to strum along to countless songs and even create your melodies. With practice and dedication, you’ll find this chord becoming second nature, and your guitar-playing journey will become all the more enjoyable.
Remember, it’s essential to place your fingers accurately and press down firmly on the strings to achieve a clear, crisp sound. As you progress in your guitar playing, the C chord will open doors to more complex chords and songs, allowing you to express yourself through music. So, keep practicing, enjoy the process, and let the sweet sounds of the C chord on your acoustic guitar fill your world with harmony and joy.