Adjusting the action on an acoustic guitar is the process of modifying the height of the strings above the guitar’s fretboard. This adjustment can be made to make playing the guitar more comfortable or to enhance its sound. It involves raising or lowering the strings at the bridge and nut, influencing the guitar’s playability and tone.
Have you ever picked up an acoustic guitar and found it challenging to play or noticed that it didn’t quite sound the way you wanted it to? Well, the key to making your acoustic guitar play like a dream and produce sweeter, more harmonious tones lies in mastering the art of adjusting its action. Whether you’re a seasoned player looking to fine-tune your instrument or a beginner seeking a more enjoyable learning experience, the ability to tweak your guitar’s action can be a game-changer.
Let’s embark on a journey into the fascinating world of guitar setup. We’ll explore the step-by-step process of raising the action on an acoustic guitar, a skill that can significantly impact your playing comfort and the overall quality of the music you create. Whether you’re looking to reduce fret buzz, improve string response, or fine-tune your instrument for a specific playing style, this adjustment is a valuable technique that every guitarist should have in their toolkit.
Understanding Action on an Acoustic Guitar

Before you dive into adjusting the action of your acoustic guitar, it’s essential to understand the concept of action and why it matters.
What is Action?
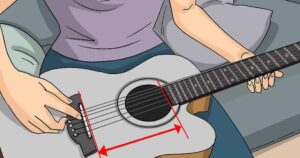
Action, in the context of a guitar, like the Difference Between Acoustic and Classical Guitar, refers to the height of the strings above the frets. This measurement plays a significant role in how a guitar feels and sounds. Action that is too low can cause string buzzing, making it challenging to play and adversely affecting tone. On the other hand, action that is too high can make the guitar physically demanding to play, potentially leading to hand fatigue.
Why Does Action Matter?
The action of your guitar impacts various aspects of your playing experience:
- Playability: Action affects how easy it is to press the strings down against the fretboard. Lower action typically results in a more comfortable playing experience.
- Tone: The action can also affect the tone of your guitar. Lower action tends to produce a warmer and smoother tone, while higher action can produce a brighter and more resonant sound.
- Intonation: Proper action is crucial for accurate intonation. If the action is too high or too low, your guitar may not play in tune up and down the neck.
- Fretting Out and Buzzing: Incorrect action can lead to buzzing and fretting out, making it difficult to play cleanly.
- String Bending: The action impacts your ability to bend strings. Low action makes string bending more comfortable, while high action requires more effort.
Now that you understand the importance of action, let’s move on to the steps to raise the action on your acoustic guitar.
Recommended Action Heights by Guitar Type
| Guitar Type | 12th Fret Action (Low E) | 12th Fret Action (High E) |
| Dreadnought | 3/32″ (2.38 mm) | 2/32″ (1.59 mm) |
| Concert | 3/32″ (2.38 mm) | 2/32″ (1.59 mm) |
| Jumbo | 4/32″ (3.18 mm) | 3/32″ (2.38 mm) |
| Parlor | 2/32″ (1.59 mm) | 1/32″ (0.79 mm) |
| Classical | 5/32″ (3.97 mm) | 4/32″ (3.18 mm) |
Note: These measurements are approximate and may vary depending on personal preference and playing style.
Tools and Materials You’ll Need
Before you begin adjusting the action on your acoustic guitar, gather the necessary tools and materials. Here’s a list of what you’ll need:
Tools:
- Capo: A capo is essential for maintaining tension on the strings while working on the saddle.
- Feeler Gauges: These are used to measure the string action accurately.
- Screwdriver: A screwdriver is necessary for adjusting the truss rod and saddle height.
- Allen Wrench: If your guitar has a bolt-on neck, you may need an Allen wrench to adjust the neck.
Materials:
- Replacement Saddle: If you need to significantly raise the action, you may consider getting a taller saddle.
- Sandpaper: For minor adjustments to the saddle’s height.
- Lubricant: To ease the removal and installation of the saddle.
Now that you have all the tools and materials ready, let’s move on to the other process of raising the action on your acoustic guitar.
Detune Your Guitar
Before you begin any adjustments to your guitar’s action, it’s essential to detune the strings. Loosen each string gradually until they are completely slack. This step ensures that you won’t damage the strings or the guitar while making changes.
Remove the Strings
Once the strings are fully detuned, carefully remove them from the guitar. You can do this by unwinding them from the tuning pegs and gently sliding them out of the bridge pins.
Assess Your Guitar’s Action
Before making any adjustments, it’s a good idea to measure your guitar’s current action. This will serve as a reference point for the changes you make. You can use feeler gauges to measure the action at various points along the fretboard, typically at the 12th fret. Different guitars may have different recommended action heights, so it’s essential to know what’s suitable for your specific guitar model.
Remove the Saddle
The saddle is the small piece located in the bridge of your guitar that holds the strings in place. To access the saddle, you’ll need to remove the bridge pins that secure it in place. Use a bridge pin puller or a flathead screwdriver to carefully lift the pins. Once the pins are removed, you can gently slide out the saddle.
Modify the Saddle
To raise the action, you’ll need to modify the saddle. There are a few ways to do this, depending on your guitar’s design and your preferences.
Option 1: Sand the Saddle
If you only need to make minor adjustments to the action, you can use sandpaper to lower the bottom of the saddle. This will effectively raise the strings’ height. Be sure to sand the saddle evenly, maintaining its flat surface. Check the action height with feeler gauges periodically to ensure it meets your desired measurements.
Option 2: Replace the Saddle
For more substantial action adjustments, you might consider replacing the saddle with a taller one. This is a more straightforward approach, especially if you’re uncomfortable with sanding the original saddle. Ensure that the replacement saddle fits your guitar properly.
Lubricate the Saddle Slot
Before reinserting the saddle, it’s a good idea to lubricate the saddle slot in the bridge. This will make it easier to install and remove the saddle in the future. A small amount of lubricant, such as graphite or a specialized guitar saddle lubricant, should suffice.
Reinsert the Saddle
Carefully slide the modified or replacement saddle back into the saddle slot. Make sure it fits snugly and is flush with the bridge. If necessary, tap it gently with a soft mallet to secure it in place.
Reattach the Strings
Once the saddle and bridge pins are in place, reattach the strings to the guitar. Begin by threading each string through the bridge and then up to the tuning pegs. Wind the strings onto the pegs while keeping them slack.
Tune the Guitar
Now that the strings are attached, begin tuning your guitar to the desired pitch. You can use an electronic tuner to ensure precise tuning. As you tune, check the action and playability of the guitar. Make sure the strings are at the desired height and that there are no buzzing or fretting out issues.
Check and Fine-Tune
After tuning, assess the action at various points along the fretboard. Use feeler gauges to ensure that the action meets your desired specifications. If you find any issues, you may need to make additional adjustments to the saddle height or replace the saddle.
Adjust the Neck (if necessary)
In some cases, raising the saddle height may not be sufficient to achieve the desired action. If you find that your guitar still has too low of an action, you might need to adjust the neck’s truss rod. Truss rod adjustments can affect the neck’s curvature, which, in turn, impacts the action.
How to Adjust the Truss Rod
- Loosen the truss rod cover on the headstock of your guitar. Some guitars have a cover, while others have an accessible truss rod nut.
- Use an appropriate tool, such as an Allen wrench, to turn the truss rod nut. Turning it clockwise typically tightens the rod, causing the neck to straighten, which can raise the action.
- Make small adjustments, usually no more than a quarter turn at a time. After each adjustment, check the action and playability of the guitar.
- Once you achieve the desired action, secure the truss rod cover or nut in place.
Final Adjustments
After making the necessary modifications to the saddle and, if required, the truss rod, perform a final check on your guitar’s action. Ensure that it meets your preferred measurements and offers optimal playability and sound.
Play and Assess
Now that your guitar’s action is adjusted to your liking, take some time to play it and evaluate the results. Pay attention to how the guitar feels, the ease of play, and the tone it produces. Make any minor adjustments if needed.
Tips and Considerations
When raising the action on your acoustic guitar, here are some additional tips and considerations to keep in mind:
1. Go Slow and Be Patient
Adjusting the action of your guitar can be a delicate process, and it’s essential to be patient. Make small adjustments and continually check the playability and sound. Rushing through the process can lead to undesirable results.
2. Document Changes
Keep a record of the changes you make to the action. This will help you track your adjustments and revert to previous settings if necessary.
3. Consult a Professional
If you’re unsure about making these adjustments yourself, or if you have a valuable or vintage guitar, it’s a good idea to consult a professional luthier or guitar technician. They have the expertise to make precise adjustments without the risk of damaging your instrument.
4. Consider String Gauge
The choice of string gauge can also affect the action of your guitar. Heavier strings generally produce more tension and may require higher action to avoid buzzing. Lighter strings, on the other hand, put less tension on the neck and may allow for lower action.
5. Check Intonation
After adjusting the action, it’s important to check the intonation of your guitar. Make sure that the guitar plays in tune up and down the neck. If necessary, adjust the saddle’s position to achieve proper intonation.
FAQs
What does raising the action on my acoustic guitar mean?
Raising the action means making the strings higher above the guitar’s fretboard. This can help improve how it plays and sounds.
Why would I want to raise the action on my guitar?
Raising the action can reduce buzzing, make it easier to press the strings, and enhance the guitar’s tone, making it more comfortable to play.
Can I raise the action on my acoustic guitar myself?
Yes, you can. It involves adjusting the saddle or nut, and you can do it with some simple tools and guidance.
Conclusion
In the realm of playing the acoustic guitar, adjusting the action is a fundamental skill that can transform your musical experience. By altering the string height above the fretboard, you can tailor your instrument to suit your playing style and preferences. Whether it’s minimizing fret buzz, making chord changes smoother, or enhancing the overall sound, raising the action empowers you to fine-tune your guitar to your liking.
While the concept might seem a bit technical at first, mastering the technique of adjusting the action on an acoustic guitar is a worthwhile endeavor for any guitarist. With simple adjustments to the saddle or nut, you can make significant improvements to your instrument’s playability and sound. It’s a skill that puts control in your hands, allowing you to customize your guitar to match your comfort and playing needs. Embrace this knowledge, experiment with your guitar’s setup, and discover the immense impact that even small adjustments can have on your playing, making your musical journey a more enjoyable and personalized one.